Checking out a document is necessary when you need to make changes or edit the content of a document located in Content Central. After checking out a document the document is marked as ‘Checked Out’ in the system to anyone else able to see the document inside Content Central.
When changes are complete, simply ‘check in’ the changed document and Content Central handles the rest; tracking those changes, updating the content and showing the revised version and updating the document’s history.
Checking in and out documents can be done using Content Director or done from the ‘Results Grid’ area of Content Central.
Using Content Director
- Select the document you wish edit.
- Go to ‘Modify’ > ‘Edit Document’.
The document should open in the native application for the document type. Edit or change the document as needed. When editing is complete:
- Click ‘Save’ in the application. If it offers the option to browse to a location use the default location and file name.

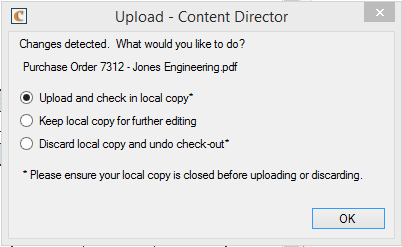
- In the window that appears, there are three options. To Check the document back into Content Central, select the first option, “Upload and check for further editing.”
- Confirm the document is back in Content Central by refreshing the browser or grid results.
Using The Results Grid
If done from the ‘Results Grid’, follow the following steps.
- Login to Content Central as a user or a member of a group with EDIT permission to the Catalog and Document Type that you want to check out.
- Navigate to the document to checkout, until the document appears in the Results Grid.
- Click to highlight the document in the Results Grid.
- In the Results Grid Menu, click ‘Modify’ > ‘Check Out/In’
- In the pop-up window, click ‘Check Out’. ( If no pop-up window appears, please allow pop-up window in the browser from your Content Central Link.)
- In the pop-up window, click ‘Download’. The document will be downloaded to your local computer based on your browser’s download settings.
- Open the document from the download folder and edit or modify the document using the default application in your computer for the file format of the document. (Example – Word for .DOC files; Excel for .EXL,… )
- When you are finished editing or modifying the document, go to ‘Folders’ > ‘Check Out’.
- Click to highlight the appropriate document.
- In the Results Grid Menu, click ‘Modify’ > ‘Check Out/In’.
- In the pop-up window, click ‘Choose File’. Navigate to the revised document to check-in. Click ‘Check In’.
- After check in of the document, the document will be removed from the ‘Check Out’ Folder.


