Users can edit documents in Content Central version 7 with the ‘Check Out’ feature. The Check Out Feature allows users to mark documents as ‘Checked Out’ and prevents other users from editing a document. Checked Out documents will appear in the user’s Work Areas > Checked Out view. While the document is checked out, no other user can check out the same document. When editing is complete, users use the ‘Check In’ feature to upload the revision of the document.
Note: The user or group must have ‘Edit’ permissions to the Catalog and Document Type in order to use this feature.
Steps to Check Out a Document
1. Login as user with EDIT Permission.
2. Navigate to a document to check out.
3. CHECK on the document.
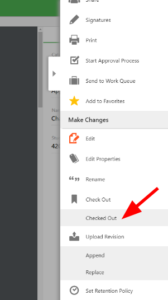
4. Click ‘Actions’ tab to open the Actions Panel.
5. From the Actions Panel, select ‘Check Out’.
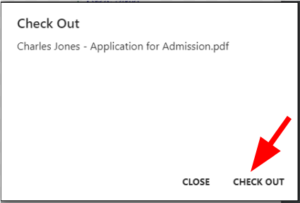
6. From the ‘Check Out’ pop up menu, click ‘CHECK OUT’.
*7. Optionally, download the checked-out document to the local computer. Make necessary changes to the document using the document’s native or default application.


NOTE: While the document is checked-out….
-
- The document is marked as ‘checked out’ for ALL users to see.
- Depending on Document-Properties Settings, field values may or may not be updated while the document is checked out.
- The document will appear in the ‘Work Area’ > ‘Checked Out’ Folder of the user who checked-out the document.
- The Document History will show the ‘Check out’ Action.
Steps to Check-In a Document
1. Login to Content Central as a user who checked out the document.
2. Go to Work Areas > Check Out.
3. Check or view the checked out document.
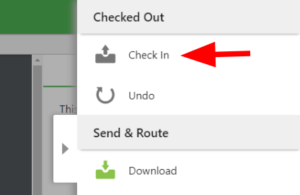
4. From the Actions Panel, click ‘Check In’.

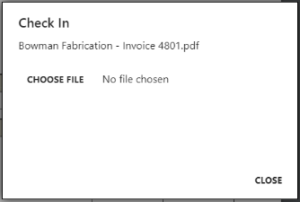
5. From the ‘Check In’ menu, click on ‘Choose File’ and then navigate to the revision of the document to check-in or import to Content Central, as a new revision of the checked out document.
6. Click ‘Check In’.

After successful check in ..
- The document will be removed from ‘Work Area’ > ‘Check Out’.
- The Document will be revised and will show the latest or uploaded (#5 above) revision version.
- The Document History will show ‘Check In’ Action.
System Setting, Document-Properties Settings

For the Document Properties Setting ‘Allow document properties to be modified when documents are check-out’, in System Settings:
- IF CHECKED, the document properties or field values may be modified when the document is checked out.
- IF UNCHECKED, the document properties or field values may NOT be modified when the document is checked out.
Go to ‘Administration > System Settings’ Page. Click ‘Apply’ at the bottom of ‘System Settings’ page to apply the changes.


