Verifying the most current version of Java is installed
Verify that the most current version of Java is installed in the PC, and that there is no out-of-date versions of Java found in the PC
- In Java.com, click ‘Do I have Java?’
- In the new window, click ‘Agree and Continue’. At the popup window, allow Java to run.
- Java response should be –
- that you have the recommended Java installed
- that no out-of-date versions were found
Uninstalling out-of-date versions of Java
Verify that no out-of-date versions of Java is installed. Uninstall all out-of-date versions of Java:
- Go to Control Panel > Programs
- Under Programs installed, please verify that ONLY ONE version of Java installed.
- Uninstall out-of-date versions of Java
Verifying installation is complete and working properly
Verifying that the installation of most current version of Java is complete, or not broken:
- There is no way to verify that the Java Installation is complete, or not broken. You may completely uninstall Java, and then download and re-install it back from Java.com
- To completely uninstall Java:
- Go to Control Panel > Programs. Under Programs installed, uninstall Java.
- To Install Java:
- From Java.com, click ‘Free Java Download’ to download Java installation setup.
- Install Java completely.
Optimal Java Configurations for Content Central
Verify these Java Configurations:
- Go to Control Panel > Java (32 bit)
- In Java Control Panel, under ‘General’ Tab, Network Settings is set to ‘Direct Connection’
- In Java Control Panel, under ‘Security’ Tab, check ‘Enable Java Content in the Browser’
Deleting all temporary internet files with Java
Delete ALL Temporary Internet Files:
- Go to Control Panel > Java (32 bit)
- In Java Control Panel, under ‘General’ Tab, under Temporary Internet Files, click ‘Settings’.
- In Temporary Files Settings window, click ‘Delete’. Select ALL options to delete ALL types Temporary Internet Files.
Restoring Java prompts, messages, and security settings
Restore All Prompts to show all message from Java, to allow popups and restore security settings
- Go to Control Panel > Java (32 bit)
- In Java Control Panel, under ‘Security’ Tab, click ‘Restore Security Prompts’
Adding Content Central to the Java Exception List
- Go to Control Panel > Java (32 bit)
- In Java Control Panel, under ‘Security’ tab, click ‘Edit Site List…’
- In ‘Edit Site List…’, click ‘Add’
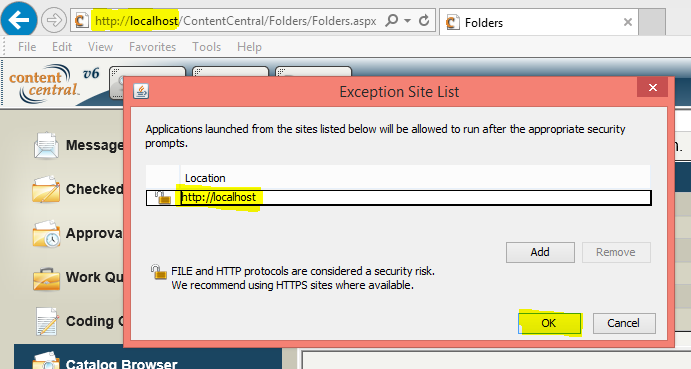
- Under ‘Locations’, in the textbox, type your own Content Central Link. Click ‘Ok’.
- Tip: Copy the URL address of your own Content Central from your open browser. Paste into the textbox, but only add ‘http://‘ and the right text after it
- Example: For the Content Central URL ‘http://localhost/ContentCentral/Folders … ‘, only type ‘http://localhost‘ (See Image Below)
- Click ‘Continue‘ on the Security Warning popup
Note: Java Security Warnings – click ‘Run‘ to allow Content Central applications to run. (Tip: To hide this Security Warning, under ‘Show Options‘, check ‘I do not want … ‘)


