The User Impersonation or Substitution Feature is available from Content Central v6.5.5891.
When ‘User Impersonation or Substitution Feature’ is enabled –
- All internal and e-mail notifications will be rerouted to the substitute(s) during the Substitution Period. The original user will not receive any notifications or messages.
- The documents in the Approval Queue and Work Queue will be available to both the original user and user’s substitute(s) during the Substitution Period.
- The original user’s permissions will be applied to the substitute(s) during the Substitution Period.
- The Substitution Period will begin and end at 12:00 A.M. Server Time.
Enabling / Disabling the 'User Impersonation or Substitution' Feature
- Login as Admin or member of the Administrator Group.
- Click ‘Admin’ found at top right portion of the Content Central Page.
- In the Admin Page, click on ‘System Settings’
- In the System Settings Page, click on ‘User Settings’ to display User Setting Options
- Click to CHECK/UNCHECK – ‘Allow user substitution’ Option
- When CHECKED, User Impersonation or Substitution Feature is enabled for Work Queue and Approval Queue.
- Click to CHECK/UNCHECK- ‘Allow users to define substitute(s)’ Option
- When CHECKED, all user(s) are allowed to specify his/her substitute and the Substitution Period from his/her User Profile.
- Click to CHECK/UNCHECK – ‘Allow user substitution’ Option

Configuring the Substitute User and Substitution Period From the User Page (option 1) and Profile Page (option 2)
From The User Page
- Login as Admin or member of the Administrator Group.
- Click ‘Admin’ found at top right portion of the Content Central Page.
- In the Admin Page, click on ‘User’.
- In the Users Page, click ‘Detail’ icon along the same row of the user to configure.
- In the User Details Page –
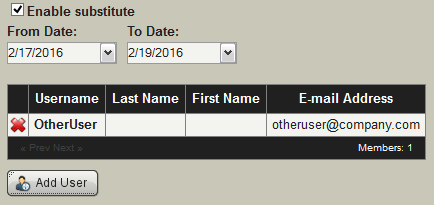
- Click to CHECK – ‘Enable substitute’ option.
- Specify the Substitution Period – Start Date (From Date) and End Date (To Date).
- The Substitution Period will begin and end at 12:00 A.M. Server Time.
- Click ‘Add User’. Click to check Substitute User(s) from the Users List.
- Click ‘Apply’ to save and apply the changes.
From The Profile Page
All user(s) are allowed to specify his/her substitute from his/her User Profile, when the ‘Allow users to define substitute(s)’ option is CHECKED in System Setting > User Settings.
- Login using your username and password.
- Click ‘Options’ found at top right portion of the Content Central Page.
- In the Options Page, click ‘User Profile’.
- In the Profile Page –
- Click to CHECK – ‘Enable substitute’ option.
- Specify the Substitution Period – Start Date (From Date) and End Date (To Date).
- The Substitution Period will begin and end at 12:00 A.M. Server Time.
- Click ‘Add User’. Click to CHECK Substitute User(s) from the Users List.
- Click ‘Apply’ to save and apply the changes.


